Infrared Training Center

Wednesday, December 20, 2017

InfraMation 2018 - Call for Papers and Abstracts

inframation2018-logoInfraMation 2018 will be held in Austin, Texas, September 11-14, 2018 and we are thrilled to be heading to the "Live Music Capital of the World". Austin is known for its vibrant buzzing energy, never-ending entertainment options, and stunning outdoor settings. One thing is for sure, we will be ready to paint the town InfraRED! Join other thermal imaging experts to learn the latest thermal imaging techniques and applications, and make valuable connections!

Hilton Austin has been chosen as the InfraMation 2018 host hotel. Hilton Austin is situated right in downtown Austin, TX, just a quick walk from exclusive shopping, amazing restaurants, and a multitude of live music venues on 6th Street and the surrounding area. InfraMation attendees receive a deeply discounted rate of $199/night plus taxes. Based on availability, this incredible rate can be extended 3 days post or prior if you'd like to stay a bit longer!

Submit your abstract through this simple online form.

Benefits & Requirements - Why should you present at InfraMation 2018?
  • Qualify for a deeply discounted conference registration fee
  • Identify yourself as an infrared thermal imaging expert in your field
  • Earn valuable certification renewal credit
  • Further validate your expertise for clients and customers
  • Expand your professional and business referral network
  • Represent your organization on a big stage
Publish your paper on a searchable CD that every InfraMation attendee receives. InfraMation is the leading infrared training experience in the world. As thermal imaging becomes more mainstream, early adopters such as yourself will be sought out for your extensive know how and experience. Simply put: InfraMation is the place to get recognized! The only "hard" requirements are that your paper be non-commercial in nature (for sponsorship or exhibition opportunities, click here) and submitted in English. Abstract approval is based on clarity, suitability, and technical merit of work.

Suggested Topic Areas
  • Buildings
    • Roofing Systems
    • Water Ingress / Moisture / Remediation / Mold Testing
    • Insulation / Air Leakage / Energy Loss
    • Standards & Certification
    • Pest Detection and Control
  • Condition Monitoring
    • Electrical Distribution - Indoor, Outdoor, Transmission, Distribution
    • Mechanical Applications - Bearings, Gearboxes, Conveyors, Steam,
    • Hydraulic
    • Standards & Certification
    • Petrochemical Applications
  • Business
    • Marketing/Sales/Pricing
    • Program Management / Cost Avoidance / Cost Saving
    • Safety
  • Research & Science Applications
  • Medical/Veterinary Applications
  • Optical Gas Imaging Applications
  • IR Report Preparation Techniques
  • Aerial Drone and UAV Applications / Techniques
  • Public Safety
  • Non-Destructive Testing - Material flaws, voids, etc.
  • Alternative / other Applications / Other Technologies


What the heck is Emissivity? (Part 2)


Fill up two soda cans with hot water and wrap one in scotch tape. Which one will cool down faster? Obvious, right? Check it out, you might be surprised!


Infrared Training Center

Friday, December 8, 2017

What the Heck is Emissivity? (part 1)


Fill two soda cans with hot water and wrap one with scotch tape. Which one will radiate more heat? You might be surprised at the answer! Watch the video to find out why.


Thursday, November 16, 2017

It is Not Always about Loose Contacts

by Ahmed Osman Mohamed Hamoudy
Electrical PM & PdM Engineer
Cemex, Egypt

In modern industries, there are many predictive maintenance techniques that can be utilized to avoid an unexpected failure. At CEMEX,  we count on those techniques and deploy them in such a way as to get the most use from it, and avoid any undesirable consequences. IR thermography's use has become widespread in cement plants; application areas typically include rotating kilns, insulation, mechanical, and electrical systems.

This article will explore the uses of IR thermography, specifically as part of the Motor Control Center systems predictive maintenance routine, including typical electrical panel failure points (contactor, terminations, feeding breaker, fuses, cables, etc...).

clip_image002
Figure 1. Rotary Kiln

One of the Clinker Rotary Kilns (4,500 Tons per Day) is supposed to be available for operation not less than a year, which is a challenge of course, to guarantee continuous operation for the kiln system for this time without any unexpected shutdown.

Monday, November 13, 2017

Emissivity and Reflected Temperature

What should I enter for my emissivity and reflected temperature values?
First, ask yourself how are you using your thermal imager?  Is it to identify thermal patterns or measure temperatures?  If you are simply trying to locate thermal patterns such as missing insulation or air leakage in a building (what is called qualitative thermography) measuring an exact temperature really isn’t necessary.  In these situations, leave the values at their default settings (typically 0.95 for emissivity and 68F/20C for reflected temperature) and go for it.

If you need to measure an exact temperature of a motor or a bearing (what is called quantitative thermography) then correctly setting emissivity and reflected temperature is a must to get the most accurate reading.  Doing so, however, should only be attempted by properly trained and certified thermographers…those who are the most qualified to measure temperatures with an infrared camera.

Thermography Certification Dates and Locations


What Is the Best Approach Until Then?
We recommend using the following basic guideline for taking simple measurements.  Know there are many other factors you will need to consider which are covered thoroughly in all ITC training classes.  Until then, to get started, let’s first define emissivity and reflected temperature.

What is Emissivity?
Emissivity is how efficiently an object radiates heat.  It’s defined as the ratio of infrared energy emitted by the object, compared to that emitted by an ideal blackbody, if both are at the same temperature.  It is represented as either a percent or a decimal.

Surfaces exhibit emissivity values ranging anywhere from 0.01 to 0.99.  A highly polished metallic surface such as copper or aluminum are often below 0.10 and are practically an infrared mirror.  Heavily oxidized metallic surfaces will have a much higher emissivity (0.6 or greater depending on the surface condition and the amount of oxidation).  Most flat-finish paints are around 0.90 (in long-wave infrared) while human skin and water are about 0.98.

What is Reflected Temperature?
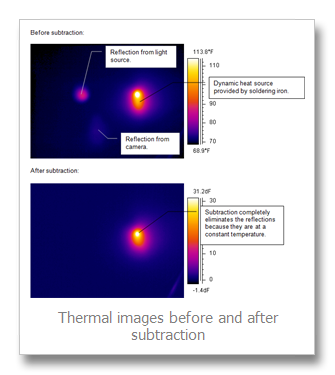
Reflected temperature (also known as background temperature or Treflected) is any thermal radiation originating from other objects that reflects off the target you are measuring.  To properly obtain an accurate surface temperature reading with thermal imaging, this value (along with that of emissivity) must be quantified and programmed into the camera’s “Object Parameters” (or corresponding software if processing a saved image).  This is used so that the software can compensate for, and ignore, the effects of this radiation as it does not relate to the actual surface temperature of the object you are measuring.

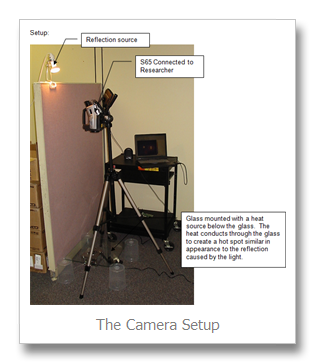
For higher emissivity objects, reflected temperature has less influence.  For lower emissivity objects, however, it’s a critical factor that *must be* understood carefully!   As emissivity decreases, what you are measuring (and seeing thermally) is coming more from the surfaces of surrounding objects (including the camera and operator), not the target you are inspecting.

How to Take a Basic Temperature Measurement
The easiest way to get an accurate measurement is to modify the surface with a material that has a high, known, and consistent emissivity value.  Standard electrical tape, with its emissivity of .95, is one such item that works well for this purpose.

If the surface is safe to touch, simply adhere a piece of electrical tape to that object and set the camera’s emissivity value to 0.95.  Next set the reflected temperature to an appropriate value for the environment.  A stable, room temperature environment will provide the best results.  If you’re still unsure what that value might be, we strongly suggest a minimum of Level I Certification training to understand this concept further.

Next, measure the temperature of the tape with the camera’s spot meter or other measurement tool, being sure that the spot meter’s circle (called the reticle) is filled completely by the target.  IMPORTANT SAFETY NOTE: This “tape method” should *only be utilized* on stationary surfaces that can be accessed safely and are okay to touch.  If attempting this type of measurement on an electrical component, the circuit *must* first be shut off and locked-out/tagged-out before proceeding.

What About Measuring Emissivity and Reflected Temperature on Other Surface Types?
For other surface types, or if temperature measurement accuracy on a variety of other objects is important for you and your inspection program, a minimum of a Level I Thermography Certification Training course is required.   Level I will teach you how to correctly adjust emissivity and reflected temperature on a variety of other components including those that are electrically energized or are difficult to access.  Attendees will learn about the proper procedures needed to evaluate both to ensure thermographers are getting the most accurate temperature readings with their thermal imager.

To learn more about these certification classes, as well as upcoming training dates and locations, please visit the Infrared Training Center online at http://www.infraredtraining.com

Thursday, October 26, 2017

Windshield Glass Reflections - How to Remove Them

by Bernie Lyon, Gary Orlove, and Jason Gagnon

"I do a lot of windshield defrost testing at different temps. And I wonder is there any way that can keep from having the camera and myself reflected back into the images."

Glass is about 15% reflective in the 8-12 micrometer waveband. If you are directly facing the windshield, you will inevitably get a reflection of yourself and the camera. I'm sure you have seen this.

One option is to change the angle at which you are observing the windshield, see the image below. If you are at point A, you and the camera will be reflected. If you are at point B, the camera will reflect whatever is above the vehicle, represented by C.

image

If there are hot objects or objects with temperature variations above the vehicle, that might make things worse. They will reflect off of the glass. If possible, you could place a high emissivity piece of material above the windshield so that all reflections off of the glass are uniform. A large piece of cardboard or a blanket might do well.

This way, you will observe only temperature changes, not patterns due to non-uniform reflections.

Another option is to use image subtraction techniques (you will have to have software which supports this, such as FLIR ThermaCAM Researcher).

  1. Take an image before running the defroster.
  2. Then save images as you normally would.
  3. Subtract the first image from the succeeding ones. The resulting image will show only changes in temperature and the reflections will have been eliminated. See the series of images below:

Wednesday, October 18, 2017

New Online Course - Basics of Fluke SmartView® Software

New from the Infrared Training Center, this tutorial will show you how to operate the essential features of Fluke SmartView® .
This course is also for ITC-trained thermographers with Fluke thermal imagers who require guidance on using the software to complete the Field Assignment portion of their infrared certification.
After taking this course, learners will be able to:
  • Launch and set-up Fluke SmartView®
  • Perform basic thermal image editing and analysis
  • Configure the Quick Report settings
  • Output a basic infrared report using the Quick Report feature
  • Draw attention with a heading.
Fluke SmartView® Course Homepage Link

Thursday, October 12, 2017

Use of the Wedge Method for Emissivity and Reflection Independent Temperature Measurement

By: Ralph Rudolph
R. Rudolph Consulting LLC @
www.temperatureconsultant.com

clip_image002A technique called the Wedge Method or Roll Nip method is finding increased use in measuring strip temperatures in the metal production/processing industries as it is touted as providing the dual advantages of appearing to be independent of the material emissivity and the presence of any ambient reflected radiation. Basically, the concept is quite simple: Picture a horizontal steel strip that contacts and at least partially wraps around a large roll, usually a deflector roll used to change strip direction or a bridle roll used to set strip tension. Aim a radiation thermometer almost parallel to the strip into the gap formed between the roll and strip tangent point, as deep as you can go. (Viewing at an angle from the side is fine). This gap, as the claims state, can be treated as a blackbody with an emissivity of 1.0 (see Figure 1). Hence, you don’t have to worry about ambient radiation as reflectivity is 0.0 and you don’t have to worry about changing material emissivity. This is partly true and partly wishful thinking.

Blackbody conditions exist for a cavity if and only if all sides of the cavity are at the same temperature. If the roll being used has a very low thermal mass (heats up easily) and there is a large wrap around the roll and sufficient strip tension to allow heat transfer to occur between the strip and the roll, then the roll will heat up to near strip temperature over a time period, but because the roll has natural convection, conduction and radiation losses, the roll can never quite reach the strip temperature. Emissivity never reaches 1.0. It should be obvious that if the strip abruptly changes temperature, which can happen with strip thickness or furnace temperature changes, it will take time for the roll to change temperatures. Heat transfer between the two can take quite a while during which time the temperature reading from the wedge system will be quite inaccurate.

Wedge or cavity measurement method
Figure 1.

So, if a system is designed well, with a major roll wrap, low thermal mass roll, sufficient strip tension and steady long term operation (no major changes in strip temperature), this method can work as claimed (except that emissivity must be set somewhat lower than 1.0 to compensate for the roll being at a slightly lower temperature than the strip).

Given human nature, however, I’ve seen numerous instances where folks have not understood why the wedge method can work and who have misapplied it. Believe it or not, I’ve seen an instance where a so-called wedge method has been applied with zero roll wrap, with the strip simply passing over a support roll. And this system was (unfortunately) designed by the equipment provider who should have known better. I would guess that a majority of wedge method applications that I’ve seen have been poorly designed, with little attention paid to the amount of roll wrap or roll material and with little understanding of what occurs during changes in strip temperature.

There is a modification to the wedge method that can provide a significant improvement: Mount a second Radiation Thermometer to monitor roll temperature and compare this reading to that of the wedge RT. Using a PC with input and output cards (and most any older PC will work), abrupt deviations between the two readings which occur as strip temperature changes can be used to correct for errors. If accuracy is desired, it’s well worth the extra expense. You get what you pay for.

Tuesday, October 10, 2017

InfraMation 2018 is Headed to Austin, Texas

InfraMation, the world’s leading IR training experience and thermal imaging conference, is headed to Austin, Texas September 11-14, 2018.  Join other thermography experts from around the world at the downtown Hilton Austin to learn the latest thermal imaging techniques and applications while making valuable connections.

Learn more and register at www.inframation.org


The best deals are now available for a limited time with our Super Early Bird options that include among other items a FLIR E8 thermal imager, the chance to win a FLIR E95 infrared camera, a FREE ITC Certification renewal, and up to $800 off your entire registration.  

More details coming soon including a Call for Papers for those who are interested in sharing their knowledge and experience with other industry professionals, plus sponsorship and exhibiting opportunities too.  Until then, follow us on Facebook (www.facebook.com/InfraredTraining) and Twitter (www.twitter.com/ITCInfrared) with the hashtag #inframation18 for the latest conference updates.

Wednesday, September 27, 2017

Furnace and Heater Tube Inspections

by Ron Lucier, ASNT NDT Level III
ITC logo registeredOne of the more challenging applications of infrared thermography is in the measurement of process heater and furnace tubes. In fact, we get dozens of inquiries each year from our clients on this very subject. Quantitative thermography is the practice of measuring temperatures accurately and with furnace tubes this requires experience and knowledge.  Success in this science is gained by being properly trained and certified as a Level I Furnace Inspection Thermographer. Certification training from the Infrared Training Center (http://www.infraredtraining.com) teaches you the techniques required for determining these values and will provide a complete understanding of temperature measurement and heat transfer.

Process Heaters
There are as many uses for process heaters as there are designs. The basic configuration consists of a shell (outer casing),   tubes (where the process fluid flows) and a heat source. These units are both thermodynamically and hydraulically complex.
Process heater or furnace diagram
The simple drawing illustrates convective gas flow, which is turbulent, and radiant heat from the flame, refractory and other tubes – all non-uniform and time varying. When you view tube from an access port typically you can only see a portion of the tube or the tube at an oblique angle. Sometimes tubes are in rows, difficult if not impossible to image.

Why are heater tubes of interest anyway?
Tubes in a fired heater
There are several reasons for inspecting tubes. Qualitatively scale buildup on the outside of the tube can be readily identified. Buildup on the inside of the tube (coking) is a bit more difficult but commonly performed. In both cases the scale or coke prevents the transfer of heat into the process fluid. In the case of scale buildup, the process fluid may not be sufficiently heated, affecting downstream processing. The case of coking on the inside of the tube is more serious. Since the coke has an increased resistance to heat transfer, the tube surface temperature increases. After all it is the flow of the process fluid that is keeping the tube “cool” in the first place. The external tube surface, unable to conduct its heat to the water, increases dramatically, causing a failure (opening) in the tube. Metallurgists use the measured temperature to calculate the life of the tube so accurate measurements are critical.

Sample Thermal Images
Tube with restricted flow
Coking on bottom of tube
Conclusion 
IR offers the operators of process heaters the ability to visualize the heat transfer and provide vital temperature data to help determine remaining tube life.  Certification training from the Infrared Training Center (http://www.infraredtraining.com) teaches you the techniques required to successfully implement this technology at your facility.

Thermography Certification Dates and Locations


To learn more about these certification classes, as well as upcoming training dates and locations, please visit the Infrared Training Center online at http://www.infraredtraining.com

Wednesday, September 20, 2017

Blower Door Inspection for Air Infiltration in a Remodeled Cottage

By Tom Coffey, Infrared Training Center 

ITC logo registeredA small cottage (700 sq. ft) outside of Knoxville, TN was completely remodeled from January to March 2010. It was an existing cinder block structure with no insulation except ½ inch of airspace between the nailers and the block wall as well as the empty block core. The R value of existing building walls was approximately 2.97. After the remodel an R-value was calculated and determined to be 12.6

2 x 4 studs were used to build the interior walls the insulated with 4” of backed fiberglass bat insulation. Old windows were removed and new double pane sash type windows installed during the remodel.

The house was depressurized to approximately 50 Pascal and allowed to equalize for 30 minutes. A thermographic scan was performed after the equalization period. Infiltration was found around the sash windows where the top and bottom pieces join in the corners of the windows.

Picture1 Picture2

There was some expected infiltration around the front door which was missing a sweep on the bottom of the door. Also infiltration was found at the attic access.

Picture3 Picture4

All of these small problems are easily correctable and will be done as time permits.

The installation of the blower door took approximately 30-45 minutes. Reaching the right depressurization took another 30 minutes and the IR scan took another 45 minutes. For a house this size, allowing for the small footprint I did not do an air exchange calculation. The purpose of this exercise was to determine if the house remodel and adding insulation was sufficient to keep the house at a comfortable level during East Tennessee summers and winters. It was determined during the remodel process that R-13 insulation in the walls and R-19 insulation in the ceilings would be sufficient for the weather conditions in this area of the country.

Wednesday, September 13, 2017

Getting Started with R&D Thermography Online Course

ITC logo registeredVideo tutorials on IR Camera Properties and getting started with ResearchIR. For any SC camera including A300, A320, SC645, SC6000, SC6700, and SC7000, SC8000 cameras.  There is NO CHARGE for this FREE  course.

Includes information on:
  • Camera Technology
    • Cooled vs Uncooled Thermal Cameras: Field of View
    • The difference between cooled & uncooled thermal detectors?
    • Cooled vs Uncooled Thermal Cameras: Speed
    • Cooled vs Uncooled: Sensitivity
  • FLIR ResearchIR Max
    • Connecting to the Camera
    • Image Enhancement
    • Image Subtraction
    • Recording Data
    • Triggering
    • Super Framing
    • Analysis Tools
    • Analysis Charts
    • Measurement Functions
    • Sharing Data
    • File Extraction Tool
  • FLIR ResearchIR and MATLAB
    • FLIR Thermal Face Detection and Tracking in Matlab
    • Opening FLIR Movies with Matlab Software
    • Connecting FLIR Systems GigE Cameras to MATLAB
    • Applying MATLAB Filters in FLIR ResearchIR Max Software
   Course Registration and Information

Thursday, September 7, 2017

IR finds Yellow Jackets Nest in House

by Sanin Mulic, Barber Foods

After attending my level one instruction during the week, and ITC wetting my appetite for thermal imaging, I returned home with my company's P-65 camera.  I decided to scan my own house to practice what I was taught all week.  All looked good until I went upstairs and noticed a bright spot on the inside wall.  I took several images of the spot and come Monday, I talked to two level 2 associates about what I had found.  There were several possibilities and I was told to take several more shots at different times to see if it moved or varied in temperature.   When we found it never moved I suggested that it might be insects (wasps, hornets, etc.) and talked with one of the other thermographers who would bring in a stethoscope to see if  I could hear them before opening up the wall.

Wasps  Wasps-vis 
Thermal image of the wasp nest (left).

I couldn’t wait, so that night armed with a drill, a can of flying insect killer, and the enthusiasm of a new thermographer,  I went up to the room; my pet cat, who loves to lay in the window there, had to investigate with me too.   I approximated where the hotspot was and drilled a 1/8 “ hole through the wall board. As I removed the drill bit, about 8 to 10 yellow jackets came charging through the hole and I started to spray the bug spray at the hole.  By this time, the yellow jackets were in an attack mode and I started to swing at them in defense.  Out of the corner of my eye I saw my cat speeding to the door with his tail bigger than I have ever seen it.  I finally killed the last one, sprayed about 1/3 of the can, and plugged the hole; but not before being stung twice.  I went outside and saw a swarm just outside the window. I drilled a second hole a few inches above it and knowing what was going to follow,  I had the spray ready to go as soon as the drill came out.  I sprayed about 1/3 of the can and then plugged the hole. I returned several hours later and the swarm was gone.  I climbed a ladder and found a small hole where they were coming and going.  I plugged that from the outside.  As I came back inside I saw my cat peaking from around the door as if to ask “Is it safe to come out now?”

After a few days I took another thermal image and there was no evidence of the yellow jackets remaining.  I submitted this investigation as my level one field report and it passed, but the memory of this initial experience will last a long time (the cat won’t forget it either!)

No-wasps no-wasps-vis
No wasps after removal.

Tuesday, August 29, 2017

Why does my Infrared Camera read higher than my Infrared Temperature Gun?

 ITC Logo TM 250 The answer is, in a word, resolution. Take a look at the image below.

7-20-2010 1-48-44 PM

The infrared camera is able to locate and measure much smaller objects than an IR temperature gun. Note the spot measurement on the infrared image; its reading is 250 F. Contrast that to the average area measurement typical of an infrared gun at a reading of 184 F. The gun is averaging all the hot areas along with the cold areas of the grating we see in the image.

Another common question is why the IR camera reads a higher temperature than a contact temperature probe? Contact temperature probes require an extremely good contact in order to read a decent temperature. In fact these probes measure their own temperature, so if the heat transfer is not good from the substrate, and the probe sensor is colder than the surface, the temperature will be lower. Also remember that contact thermometers act as heat sinks, sucking heat out of a surface.

Wednesday, August 23, 2017

IR Pictures Through a Grating or Mesh

Question from a customer: “Scanning through the steel grating I read a temperature 5 to 15 degrees Celsius lower than scanning without the grating. I know it is to do with the steel grating but I was wondering why.”
Great question. Let’s take a look at a typical situation with and without a grating, and then placing the grating at different distances to the camera.
The distance between the fuse and the camera remains constant, and the camera is always focused on the fuse. The only changes are the insertion of the grating, and the distance of the grating from the infrared camera.
IMG00077-20120215-1115IR_0001DC_0002
Figure 1. Looking at a fuse directly with no grating. Max temperature is 51.4 C.
IMG00078-20120215-1116IR_0003DC_0004
Figure 2. We have inserted the grating close to the fuse.
Max temperature dropped to 51 C, a small error.

Friday, August 18, 2017

What does Sensitivity (NETD) mean when applied to a Thermal Imager?

Sensitivity expresses the ability of an infrared camera to display a very good image even if the thermal contrast in a scene is low. Put another way, a camera with good sensitivity can distinguish objects in a scene that have very little temperature difference between them.
Sensitivity is most often measured by a parameter called Noise Equivalent Temperature Difference or NETD, for example, NETD @ 30 C : 80mK. A Kelvin degree is the SI base unit of thermodynamic temperature equal in magnitude to a degree Celsius, so mK means thousandths of a degree (80mK = 0.080 K).
What is NETD? NETD is defined as the amount of infrared radiation required to produce an output signal equal to the systems own noise. This is a noise rating of the system and should be as low as possible. We are not talking about how loud the system is here!!! We are talking about electronic noise that we translate into a temperature difference at an object temperature of 30 C (86 F).

Tuesday, February 7, 2017

Call for Papers: ITC International User Conference - September 2017

Main paper presentations at the 2014 ITC User Conference in Stockholm, Sweden
Join the biggest ITC event in Europe and contribute with a paper, poster, or seminar!

ITC and FLIR Systems invite you to share your thermography expertise with other professionals in your field at the ITC User Conference in Coventry, UK, on September 27–28, 2017.

The ITC User Conference is a professional meeting place for technicians, engineers, scientists, and users of all types of infrared measurement equipment. It will cover infrared physics and its applications in a wide variety of fields, from inspection of electrical installations, building surveys, industrial and automation applications, optical gas imaging to NDT and advanced research applications.

Seminars, presentations, and poster sessions all depend on you and your contribution, so we ask you to submit your conference paper now:
  • Long paper - duration of the presentation about 40 minutes
  • Short paper - duration of the presentation about 20 minutes
  • Poster
  • Seminar - highlight trends and technologies with future importance for the field of thermography and infrared measurement.
The conference language is English.

Please submit the title and abstract by April 15, 2017 to Christiane Buchgeister at se@irtraining.eu

Abstracts
FLIR Tools was just one of the many seminars offered at the 2014 event in Sweden

Abstracts to be no longer than 500 words. The following information to be included: preferred type of presentation, title, primary author and affiliation, co-authors and affiliations, primary author’s contact details (full postal address, phone number, e-mail address), list of key words.

Notification of Acceptance or Refusal

ITC EMEA will notify all authors of its decision on 20 May 2017. This notification will include
instructions for the selected authors on how to prepare and submit their finished paper by August 14, 2017.

To encourage the exchange of applications, information, primary authors presenting their papers will attend the conference for only € 199.

If you would like to attend the event without presenting a paper, simply register at
www.infraredforum.eu/register or visit the conference website at www.infraredforum.eu
or email us at training@flir.se for more information.

Monday, January 30, 2017

New Training Dates Announced for sUAS Level I Thermography Certification

The new sUAS Level I Thermography Certification course from the Infrared Training Center (ITC) is designed for thermographers who require training specific to aerial IR inspections.  This class will cover all the potential applications, types of equipment used, what business opportunities exist, the infrared science behind how the technology works and the required regulations one needs to follow to enter this new and rapidly growing field.  As such, part of the course will also focus on introducing students to the FAA Part 107 rule which is required for all commercial sUAS operations in the United States.  

The following dates and locations have been announced in 2017:

Atlanta, GA
April 25-28

Boston, MA (ITC Headquarters - Nashua, NH)
May 15-18

Dallas, TX
June 6-9 


King of Prussia, PA
August 22-25

Nashville, TN
September 19-22

Learn More and Register Here

Attendees who successfully complete all course requirements, including their field assignment, will receive a sUAS level 1 Infrared thermography certification from ITC.

Wednesday, January 4, 2017

New Online Course - Introduction to FAA Part 107 Small Unmanned Aircraft Systems

The FAA has developed regulations to allow the operation of small unmanned aircraft systems (sUAS or drone) in the National Airspace System (NAS) for purposes other than hobby and recreation. The rules are specified in 14 CFR part 107 and address UAS classification, certification, and operating rules.

This course is designed to introduce applicants wishing to operate a sUAS for commercial purposes to Part 107 knowledge. In addition, we include an infrared thermography primer for those wishing to use airborne thermography as an inspection tool.

Course Structure
This course can be taken on a computer, tablet, or a smartphone. For the best experience, we suggest a device with a larger screen for easier readability. It will take approximately 1.25 hours to complete this material.

At the conclusion of each lesson, there will be a knowledge check followed by a lesson summary.

At the conclusion of the course, you may then print a course completion certificate. Presenting this certificate when registering for an instructor led Level I sUAS Certification Course will entitle you to a discount equal to the purchase price of this online course.

Learn More